Graphs

A graph algorithm visualizer written in JavaScript using the Canvas API

When I was first learning about the graph data structure and its various algorithms, I came across several graph algorithm visualization websites which helped me improve my understanding of these algorithms. As a fun little personal project, I decided to implement my own web-based graph algorithm visualizer.

Figure 1: Preview of the application.

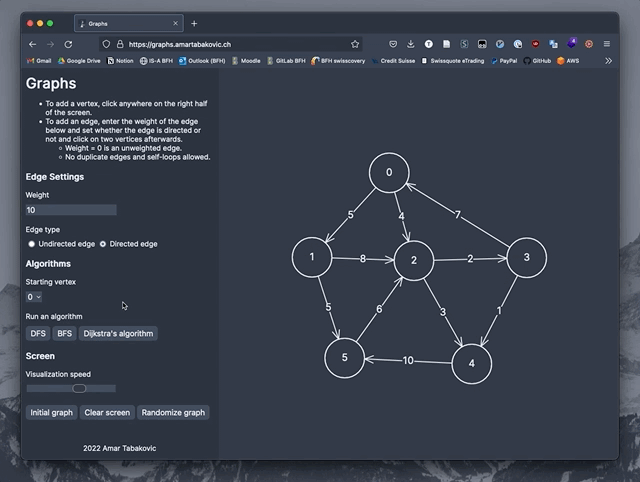
The application can be accessed under graphs.amartabakovic.ch. The source code is in the GitHub repository AmarTabakovic/graphs and is licensed under the MIT license.


Features

What Can It Do?

The application is currently able to do the following:

  • Allow custom graph creation with (un)weighted and (un)directed edges
  • Generate randomized graphs
  • Compute and visualize the following algorithms from a chosen initial vertex:
    • Depth-first search
    • Breadth-first search
    • Dijkstra’s algorithm
  • Adjust the visualization speed dynamically

What Can It Not Do?

Some of the following features were explicitly not implemented:

  • Negative weights (since e.g. Dijkstra’s algorithm would be unable to run properly in that case)
  • Responsiveness, especially for small screen sizes

Implementation Details

Technologies

For this project, I mainly used plain JavaScript and its built-in Canvas API. The styling is done with SCSS. I picked a boilerplate Webpack project for bundling and minifying. The application is hosted on AWS Amplify.

Application Structure

The application is split up as following:

src
├── fonts
│   └── Inter.ttf           
├── images
│   └── favicon.png
├── index.js                // Entry point of the application.
├── js
│   ├── algorithms.js       // Contains graph algorithms.
│   ├── canvas.js           // Contains functions for canvas manipulation and drawing.
│   ├── edge.js             // Represents a single edge in a graph.
│   ├── graph.js            // Represents a single graph.
│   ├── main.js             // Main application file.
│   ├── state.js            // Stores the global state of the application.
│   ├── ui.js               // Responsible for certain UI elements.
│   └── vertex.js           // Represents a single vertex in a graph.
├── styles
│   ├── _form.scss          // Form styling.
│   ├── _mobile.scss        // Mainly for mobile error message.
│   ├── _scaffolding.scss   // Style scaffolding.
│   ├── _variables.scss     // SCSS variables.
│   └── index.scss          // Main SCSS file.
└── template.html           // HTML template.

The Graph Data Structure

Graph Class

For the graph data structure, I implemented a class Graph in the file graph.js. This class contains methods for inserting edges and vertices and for resetting the graph’s state to before an algorithm was run. It also contains a static method that returns a new graph with randomized vertices and edges. Vertices and edges are saved in the graph’s internal vertex list and edge list.

Vertex Class

The class Vertex in the file vertex.js represents a single vertex that a graph can have. A vertex has a $(x,y)$-position to know where it is positioned on the canvas. A vertex also has an ID, a list of incoming edges and a list of outgoing edges. Lastly, the vertex has a state, which can be either unexplored or explored. The possible state values are saved in the enumeration VERTEX_STATES.

Edge Class

The class Edge in the file edge.js represents a single edge between two vertices. An edge consists of two vertices vertex0 and vertex1 and can be directed or undirected. The edge always gets added to the outgoing edge list of vertex0 and if the edge is directed, the edge gets added to the incoming edge list of vertex1. If the edge however is undirected, the edge gets added to the to the outgoing edge list of vertex1 as well, since undirected edges are always outgoing from both vertices. Furthermore, an edge has a weight that must be positive and a state that is either unexplored, discoveryEdge, backEdge, crossEdge or relaxed. The possible state values are saved in the enumeration EDGE_STATES.

Drawing the Graph on the Canvas

HTML Canvas Elements

There are two separate <canvas> elements, one for the vertices and one for the edges. The edge canvas lies on top of the vertex canvas and is responsible for catching all mouse press events. The reason for this is that with a single canvas, vertices and edges would be able to draw over each other in an inconsistent manner. For example, if one were to draw two vertices and an edge between them, one could add a third vertex between the two vertices, which would then be drawn on top of the edge. With the current approach with two canvasses, edges are drawn on top of vertices by default, thereby avoiding inconsistencies when drawing the graph. The canvas layering approach is shown in figure 2.

Figure 2: Canvas layering approach.

Drawing Logic

The file canvas.js is mainly responsible for the canvas drawing logic and contains methods for drawing vertices and edges.

Drawing Vertices

The function drawVertex(vertex, vertexColor) draws a given Vertex instance in a given vertexColor. The vertex is drawn at its \(x\) and \(y\) positions on the vertex canvas with a radius given by the constant VERTEX_RADIUS. The ID of the vertex is drawn as text in the center of the vertex.

Drawing Edges

The function drawEdge(edge, edgeColor) draws a given Edge instance in a given edgeColor. The edge is drawn such that there is a line from the border of vertex0 to the border of vertex1. This means that instead of drawing the edge line directly from the \((x,y)\)-positions of both vertices, the edge line needs to be offset from the center of the vertex by the vertex radius, otherwise the edge line would be visible inside of the vertex. Thus, the line needs to be drawn from \(\left(\begin{smallmatrix} v_1 + r_{1}\\ v_2 + r_{2} \end{smallmatrix}\right)\) to \(\left(\begin{smallmatrix} w_1 - r_{1}\\ w_2 - r_{2} \end{smallmatrix}\right)\), with \(\vec{v}=(v_1, v_2)\) corresponding to vertex0, \(\vec{w}= (w_1, w_2)\) corresponding to vertex1 and the vertex radius \(r = \sqrt{r_{1}^2 + r_{2}^2}\) corresponding to VERTEX_RADIUS.

As a first step, the angle \(\theta\) of the edge line is calculated with \[\notag \theta = \text{atan2}(w_2 - v_2, w_1 - v_1).\] Afterwards, \(r_1\) and \(r_2\) are calculated using \(\theta\) and \( r \): \[\notag\begin{align*} r_1 &= \text{cos}(\theta) \cdot r\\
r_2 &= \text{sin}(\theta) \cdot r. \end{align*} \] Now, the edge line vector \(\vec{e}\) is given by \[\notag \vec{e} = \begin{pmatrix}(w_1 - r_1) - (v_1 + r_1) \\ (w_2 - r_2) - (v_2 + r_2)\end{pmatrix}.\] For drawing the edge using the Canvas API, it suffices to know \(\left(\begin{smallmatrix}v_1 + r_1\\v_2+r_2\end{smallmatrix}\right) \) and \(\left(\begin{smallmatrix}w_1 - r_1\\w_2-r_2\end{smallmatrix}\right) \). Figure 3 visualizes the components in play when drawing edges.

Figure 3: Edge drawing components.

For directed edges, the arrow head also needs to be drawn. The negative \(-\vec{e}\) of the edge line vector \(\vec{e}\) serves as a direction vector from \(\vec{w}\) to \(\vec{v}\). From \(-\vec{e}\), a normalized vector \(\vec{i}\) is calculated as \[\notag \vec{i} = \frac{ -\vec{e} }{\lvert \lvert -\vec{e} \rvert \rvert }.\] Next, the arrow head position vectors \(\vec{a}\) and \(\vec{b}\) are calculated by rotating \(\vec{i}\) by the angle \(\alpha\) in both directions and extending the length by \(l\). The variables \(\alpha\) and \(l\) are defined by the constants ARROW_HEAD_ANGLE and ARROW_HEAD_LENGTH respectively: \[\notag\begin{align*} \vec{a} & = \begin{pmatrix} (w_1 - r_1) + (i_1 \cdot \text{cos}(\alpha) - i_2 \cdot \text{sin}(\alpha)) \cdot l \\ (w_2 - r_2) + (i_1 \cdot \text{sin}(\alpha) + i_2 \cdot \text{cos}(\alpha)) \cdot l \end{pmatrix},\\
\vec{b} & = \begin{pmatrix} (w_1 - r_1) + (i_1 \cdot \text{cos}(\alpha) + i_2 \cdot \text{sin}(\alpha)) \cdot l \\ (w_2 - r_2) + (-i_1 \cdot \text{sin}(\alpha) + i_2 \cdot \text{cos}(\alpha)) \cdot l \end{pmatrix}. \end{align*} \] Figure 4 shows all components required to draw an arrow head.

Figure 4: Arrow head drawing components.

Getting Input From the Canvas

The edge canvas catches all mouse press events and dispatches them to the function handleCanvasClick(event, graph). In a first iteration, it checks whether any of the vertices has been clicked on using the function checkCoordOnVertex(event, graph), which takes an event object and the graph to check as its arguments. If a vertex has been clicked on, it checks whether another vertex has already been clicked on previously. If the second clicked on vertex is the same vertex or if there is already an edge between the first and the second vertex, the function simply returns, so that no self-loops or double edges get created. Otherwise, it creates an edge between the first and the second clicked on vertex and draws it to the edge canvas using drawEdge(). Afterwards, the function returns. If no vertex was clicked on, a second iteration over all vertices happens and checks whether the mouse press event occured in the vicinity of a vertex using the function checkCoordsNearVertex(event, graph), which also takes an event object and the graph to check as its arguments. Here, the vicinity is defined as the rectangle with the \((x,y)\)-coordinates of a vertex as its center and side lengths four times the radius of a vertex, as shown in figure 5. If the mouse press event occured near a vertex, the function simply returns. This is so that vertices are not grouped too close to each other.

Figure 5: Vertex coordinate checking boundaries.

Otherwise, if the function did not return at an earlier point, a new vertex is created at the location of the mouse press event, added to the graph and drawn on the vertex canvas with drawVertex().

Graph Algorithms

I mainly used the book Algorithm Design and Applications by Goodrich and Tamassia [1] as a reference point for the algorithms.

Every time an algorithm is initiated, the function beforeAlgorithm(graph) is called with the graph to run the algorithm on as its argument. This function resets the graph’s state, draws it on the canvas and sets a flag signifying that an algorithm is running. After an algorithm finished running, the function afterAlgorithm() is called, which unsets the previously mentioned flag.

Each step in an algorithm is accompanied by a colouring of a vertex or an edge and a delay before the next step. The usable colors are saved in the enumeration COLORS with possible values green, yellow, blue, white and canvas. The delay is implemented with the function sleep() that sleeps for a certain amount of milliseconds. The number of milliseconds is given by the application state variable visualizationDelay. This state variable is mutated by the slider on the sidebar of the application.

/**
 * Sleep function for visualizations.
 *
 * @returns promise
 */
const sleep = () => new Promise((resolve) => setTimeout(resolve, state.visualizationDelay))

This example with depth-first search aims to show the main principle behind visualizing single steps of all implemented algorithms. The depth-first search algorithm over a connected component from the starting vertex startingVertex is shown below:

/**
 * Performs a depth first search over the connected component
 * from a given starting vertex.
 *
 * @param {Vertex} startingVertex vertex to start the DFS from
 */
const depthFirstSearch = async (startingVertex) => {
  startingVertex.state = VERTEX_STATES.explored
  drawVertex(startingVertex, COLORS.blue)
  await sleep()

  for (const e of startingVertex.outgoingEdges) {
    if (e.state === EDGE_STATES.unexplored) {
      /** Opposite vertex from the starting vertex. */
      let w
      if (e.vertex0 == startingVertex) w = e.vertex1
      else if (e.vertex1 == startingVertex) w = e.vertex0

      if (w.state === VERTEX_STATES.unexplored) {
        e.state = EDGE_STATES.discoveryEdge
        drawEdge(e, COLORS.green)
        await sleep()
        await depthFirstSearch(w)
      } else {
        e.state = EDGE_STATES.backEdge
        drawEdge(e, COLORS.yellow)
        await sleep()
      }
    }
  }
}

The algorithm starts out by setting the state of the starting vertex to VERTEX_STATES.explored and coloring it blue. Next, it iterates through all outgoing edges of the current vertex. If the current edge e is unexplored, i.e. it has the state EDGE_STATES.unexplored, it first determines the vertex w opposite from the current vertex. Since it is possible that w is either the vertex0 or vertex1 property of the edge, it checks which one of them is the current vertex and takes the vertex opposite from that. The algorithm then checks whether the w has not been explored yet, i.e. whether it has the state VERTEX_STATES.unexplored. If so, it colors e green, sets its state to EDGE_STATES.discoveryEdge and recursively calls depthFirstSearch(w), which then repeats the previous steps until all vertices and edges have been visited. If the current vertex w however was already explored, e simply gets drawn yellow and its state is set to EDGE_STATES.backEdge.

Generating Random Graphs

The generation of random graphs is mostly implemented in the static method createRandomizedGraph() in the class Graph, which returns a new Graph instance with randomized vertices and edges. The method starts out by calculating the number of vertices and edges that need to be created. The number of vertices is a random integer \(V\) with \(5\leq V \leq 15\). The number of edges is a random integer \(E\) with \( \frac{V}{2} \leq E \leq {V \choose 4} \). Next, it generates a random boolean \(D\) that determines whether the graph is directed or not. This boolean \(D\) will be set as the value of the property isDirected of every edge that will be created later. Afterwards, it generates \(V\) vertices with random \((x,y)\)-coordinates, such that the vertices do not collide with each other and that their \((x,y)\)-coordinates lie inside the bounds of the canvas plus some padding. The collision check and bounds check is handled by the function checkCoordsNearVertex(). After the vertices get generated, the \(E\) edges need to get generated. For this, two random vertices \(v_1\) and \(v_2\) are chosen from the graph’s vertex list, such that there is no edge between them already. Afterwards, if two such vertices are found, the edge weight is generated as a random integer \(w\) with \(0 \leq W \leq 40\). Finally, the edge gets created with its properties set to \(v_1, v_2, D, W\) and added to the graph.

Some graphs I found to be interesting are shown below in figure 6 :-).

Figure 6: Three examples of randomized graphs.

Outlook

Overall I am pretty happy with the application. There are still certain features that I want to implement in the future, which include:

  • More graph algorithms, even though I would have to check for special cases (e.g. negative weight cycles). Some of the algorithms that I want to implement are:
    • Floyd-Warshall algorithm
    • Prim-Jarnik algorithm
    • Kruskal’s algorithm
    • Eulerian path
    • Hamiltonian path
  • Animated edge drawing with transitions
  • Proper responsiveness
  • Improved random generation of graphs so that the number of edges and vertices is dependent on the browser window’s dimensions

References

  1. Michael T. Goodrich, Roberto Tamassia. Algorithm Design and Applications. Wiley Publishing, 2014